Upcycled balance bike
Hi, today I would like to share with you one of my biggest project of the year. I am a bit of a creative addict: I need new projects to do, like, constantly. The moment I begin one thing, I already know what I'll be doing next. This project isn't one I'd really planned, but the opportunity showed up and well…I said yes.
For my girl's second birthday, I wanted to get her a balance bike. I know she's still a bit young for that, but she could take interest in it and grow with it. I had my eyes on Banwood's balance bike but since we only live on one income at the moment and my girl isn't the most gentle at the moment, I wasn't ready to spend over £100 on one. On the other side, I wasn't eager to buy a cheap one that would only survive a year. So I started looking at eBay and Shpock and there it was.

The rusty wooden bike
An old rusty wooden thing on 2 wheels which had clearly seen better days. It was just a few miles away from home and came with a £5 price tag. Because it was made of wood, I knew it wouldn't be too hard to refresh. We've done a few pieces of furniture and the process is the same: clean, sand, prime, sand, paint, sand, varnish. We had a whole month to get it done, so the following day I picked it up and started to think about what to do with it.
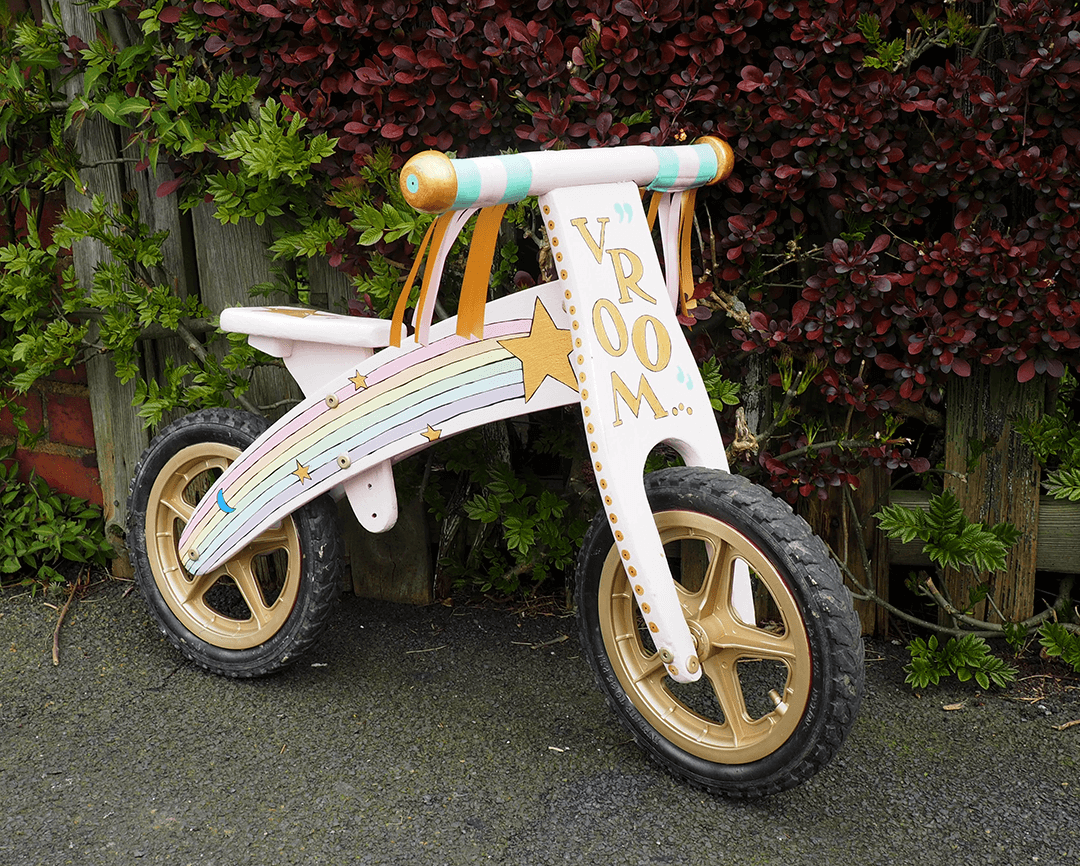
My husband took it apart and sanded it, put the metallic pieces in an anti-rust solution (he might have used malt vinegar at first, claiming it was "close enough"), before applying a pink chalk paint we had used on a chair and mirror before (there's no small savings). I didn't want it completely white but I didn't want it super colourful either.
Painting the shooting star design


For the rest of the decor I used my acrylic paint. I decided to go for a simple shooting star illustration with a pastel rainbow on the crossbar and the word "Vroom" on the front. Since the bike had been taken apart, it was easy to take each piece and trace the shape on a large sheet of paper.
I wanted both sides of the crossbar to be the same so I drew a rough outline of the illustration that would be copied for each piece. I used the simple method of copying on tracing paper and pressing the sheet on the wood, then doing the other side the same way. It left just enough pencil to see the design.


Once the drawings were ready, I applied the colours. I started with the gold, then did the rainbow. I recommend that you paint lines 1-3-5 then 2-4-6 so the wet paints never touch. When all the layers were done I added the black outline. I waited another day before applying my coats of clear varnish. A fairly straightforward process.

The fabric handles
The most damaged part of the bike were the handles. The foam was really old and split and on one side it had red tape holding it together. So that had to go.


I didn't know how to replace it so I chose to make something different. I measured the width and circumference of the handle and decided to make a simple padded rectangle with velcro attachment that would work like sleeves. I also really wanted to add ribbons, so I added them on one end. Each sleeve is made of three strips of fabric stitched together, then I used a thin foam sheet inside.

If you're interested in making some for your own child, let me know in the comments and I'll work on a little tutorial.
Overall, I am over the moon with the result. The colours are exactly what I wanted and I think it looks both girly and feisty. Completing this project comforted me in my belief that second-hand is just as good as brand new. To be frank, at the moment second hand is my favourite because it allows me to be creative without fearing the damage if anything goes wrong. So many things could be mended and customised to give them a few more years of use and doing it ourselves brings a huge feeling of achievement as well. So don't be scared and just try for yourself.