Garden Apron Tutorial (free pattern)

One of the things I love about Spring is the chance to finally go to our garden again, enjoy the first fresh flowers and plan which fruits and vegetables we will grow. I made this sturdy and waterproof apron when my daughter was 2 and she’s used it a lot to play in the garden. It’s also great if you have a mud kitchen or if they like playing with water.
I created this tutorial with FREE pattern for anyone who knows the basics of sewing. It’s fairly easy to make and you can choose to add the waterproof coating or simply use it as is. A classic linen would also look beautiful. If you want to download it, just follow this link.
The pattern doesn’t contain instructions, so you will need to follow the tutorial below.
Please note that this pattern is for personal use only.

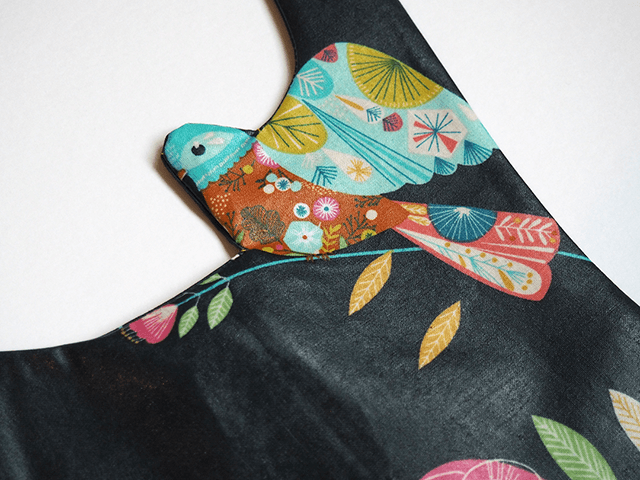
I didn’t want to fiddle with ties and bows and wanted something that’s easy to clean and still cute to wear. So I decided that a cross back style would be the best. After I discovered the bird panel from Dashwood Studio’s Flock collection, I knew I had something unique. I love the fact that it’s a bigger pattern with no repeat and the 60cm width is just what’s needed for a two year old.
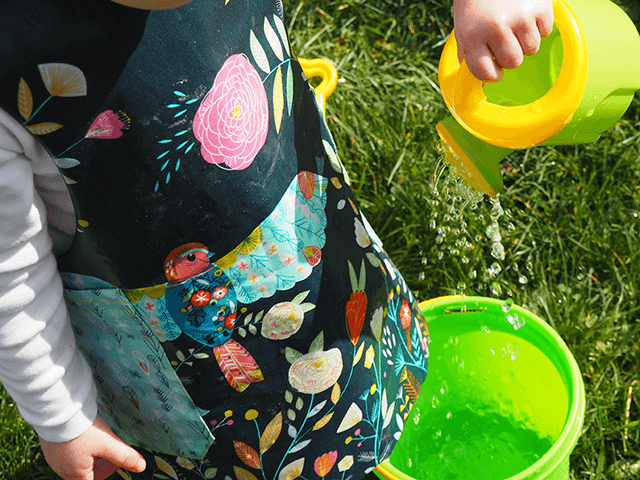

I added two rows of snaps so she can grow into it and I’m sure this will fit a child from 85cm to 105cm tall. I applied the Odicoat waterproof gel to the outside, which was really easy and made all the difference. My girl loved it and kept it literally all day long and to be honest, you don’t even need to have a garden to enjoy it. Crafts, baking or just eating are other uses for this project.

Applying the gel takes a few minutes for each coat and you just need to do it the day before sewing, so it really is a great solution and… you’ll have plenty left for more projects. Once the fabric is ready, your apron should be complete in 2 hours, even if you’re a beginner. So give it a go!
Materials needed:
For your pattern:
Free apron pattern
Printer and paper
Scissors
Tape
To make the apron with accent straps and pockets:
1 fat quarter for the pockets
2 fat quarter for the straps
1 x 60cm panel of Dashwood Studio’s ‘Flock’ panel or ¾ meter for main body
1 jar of Odicoat + Odicard applicator (you will use about half of it)
1 paint brush
Parchment paper
Coloured snaps: 2 male and 4 female parts Prym ones are the best and because they are plastic ones, they won’t rust.
Pattern hack: if you want to keep it really simple, use the same fabric for the full apron. 1 meter of fabric will be enough. Join the shoulder strap and front panel pattern pieces on the dotted lines and forget Part 3, step 6.
-----------------

Part 1: Prepare your pattern
Download and open your free garden apron pattern. This pattern requires 7 pages of paper.
Print the pattern on A4 paper, making sure that it is scaled to 100%. You can check this by measuring the 5cm test square on the pattern.
Cut each sheet along the dotted lines to remove the grey area and piece your pattern together with tape.
Cut the 3 pieces needed.

Part 2: Waterproofing your fabric
There are different ways to waterproof fabric. I really like Odicoat because it leaves your fabric flexible and has a nice waxy finish, so it doesn’t look plasticky. You can apply 1 to 3 coats, making it more waterproof every time, so you decide the finish that you want. It is important that the surface of your fabric is flat to insure an even coating, so wash and iron your fabric before first use to reduce the risk of shrinkage.
Note that your fabric should be coated 24hrs before making the apron as 12hrs are recommended between the last layer and the fixing stage.
Prepare your fabric pieces. Applying the Odicoat will shrink your fabric a bit, so don’t cut your exact pieces yet. Instead, place your pattern pieces and cut rectangles with at least 5cm margins around. Cut one rectangle to fit both pockets, one rectangle for 2 straps and 1 rectangle for the apron front (make sure your pattern piece is placed on the fold as required).

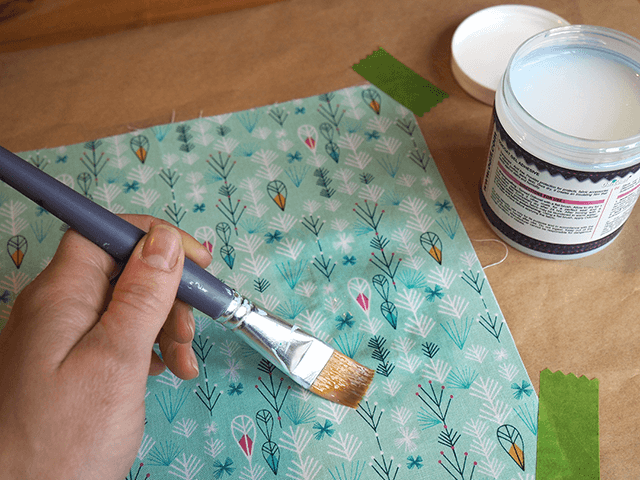

If you’ve never used Odicoat before, start with the smallest piece. One a flat surface, place a large piece of parchment paper and tape it down. Place your fabric piece on top and tape it to the parchment paper.
Open your Odicoat jar and start applying a thin layer with a brush. Cover the fabric with it. Once it’s done, take the Odicard (a plastic debit card will do too) and gently scrape the surface, removing all excess. Place the excess back in the jar. You shouldn’t have any shiny lines: the fabric should look damp but not soaked.
Gently peel your fabric off the parchment paper and let it dry for a couple of hours. I hung my pieces on the airer, holding corners with tape. Repeat with each piece of fabric.
For this project, I recommend applying three layers because kids can get really messy with water. The gel is easier to apply and faster to dry after the first coat.Leave your fabric to completely dry overnight.
The last step to prepare your fabric is ironing. Turn your iron on a warm but not hot setting. Silk/Wool is fine.
Place your piece of fabric with coating facing up, cover with parchment paper and iron. The fabric will stick a bit to the paper but will peel easily. Repeat on the other side of the fabric.
Now you can enjoy the soft shiny finish!


Part 3: Making your garden apron
Because of the waterproof surface, I advise you not to use pins as they could leave small holes in the fabric. Instead, use little craft clips.

On the wrong side of the fabric, lay your pattern pieces, trace the shapes and cut. Don’t forget to transfer the marks for the snaps and the pockets. The coated side is a bit slippery, so if you want to be very precise, cut each piece separately but don’t forget to mirror them.
Here are the pieces you’ll end up with: shoulder straps x4 (2 mirrored on waterproof fabric, 2 mirrored for lining), pockets x2 (mirrored on waterproof fabric), front panel x2 (cut on the fold, 1 on waterproof fabric, 1 of lining)
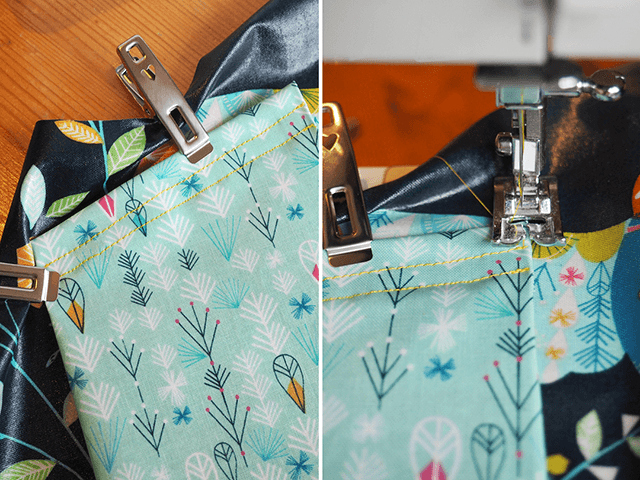
Make the pockets. Fold the sides and bottom edges by 1cm. Use your iron and parchment paper to keep the fabric in place. Hold corners with clips.
For the top, fold first at 5mm, then again at 1.5cm and clip in place. There’s no need to finish the edges inside as the coating prevents it from fraying.
Make two lines of stitches at the top of the pocket, one at 1cm from the edge and another at 1.5cm. Repeat for the second pocket.


Place you pocket on the marks on the front panel. Use the clips to hold your pocket in place. It’s a bit fiddly but if you go slowly, it will work just fine. Stitch as close to the edge of the pocket as possible. Repeat for the other side.

Attach the shoulder straps to the front panel. With right sides together, align both pieces on the straight edge, hold with clips and stitch, using a 1cm allowance.

Iron flat (with parchment paper) and cut the pointy end. Repeat for the other side and the lining pieces. You should now have two full aprons.


Lay your two apron pieces with right sides together and place as many clips as you can. Stitch around the edge using a 1cm allowance.
Leave a 6cm opening to turn your apron inside out.


Clips the curves all around your apron and turn inside out. Now this looks like a proper apron! Finish the open edge by hand.


All that’s left to do is place the snaps. If you’re using plastic ones, I suggest you make a tiny hole with the point of the seam ripper as it will help the snap go through the fabric. Make sure that the snaps on the front panel are facing down and the ones on the shoulder straps are facing up. This apron is designed to have the front part of the strap overlaying the back.


Now you’re ready to enjoy a bit of gardening with all the family!

Have you made one of these aprons?
Then share with everyone by tagging me @pompomdumonde on Instagram or Facebook! I love to share what other crafters are making!